|
 |
 |
|
|
"HOW DO YOU DO THAT?" is a question I am frequently
asked, so here I share a few 'secrets' of the image making
process. There's more to it than meets the eye. I use the
Nikon Coolpix 990 digital camera, the superb Macintosh iBook
computer, and Adobe Photoshop, the industry standard image
enhancing software package.
|
|
|
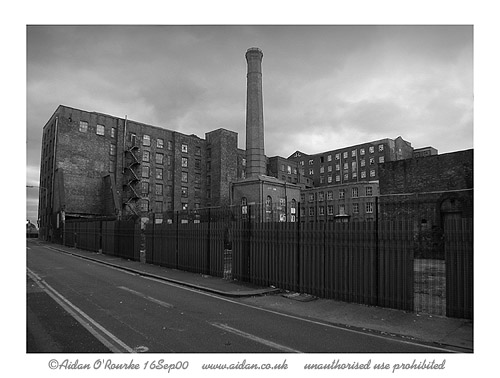
MURRAY MILLS ANCOATS
Q: How did you get the sky to look dark and the building
NOT to look dark?
A: Most outdoor pictures feature the sky, but it's often
several times brighter than the rest of the scene, leading
to problems: Frequently you get a bleached white sky and/or
dull shadowy areas below. How can you get the right exposure
for both the sky and the dark areas?
Answer: Take two pictures. The first one I aimed at the sky,
held the shutter down lightly, aimed at the warehouses and
took the shot. The sky is nicely grey, but the buildings are
almost black. For the second one I aimed at the warehouses
- they came out a mid-grey but the sky is pure white.
In Photoshop, I opened the first image - with the dark sky.
Then opened the second image - with the white sky, and placed
them on layers one on top of the other. I deleted the white
from the lighter image, revealing the grey clouds on the image
below. I lightened the grey to make it look more natural.
Finally, I merged the two layers, giving the final picture.
Final enhancement: With the cloning tool, I removed the wall
top right.
Another solution: Use a graduated filter to darken the clouds.
|
|
|
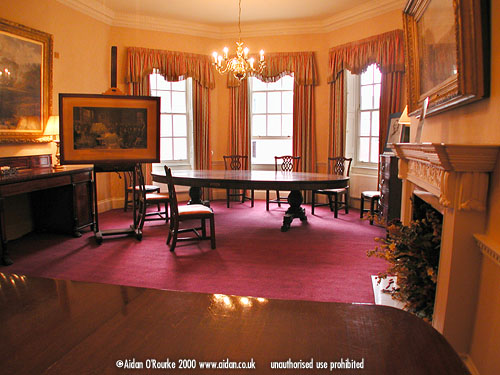
INTERIOR OF COBDEN HOUSE QUAY STREET
Q: How did you get the lighting to look so nice?
A: Many camera users assume: If it's dark, use the flash.
But using a flash can be like a shining a searchlight into
a room - very unnatural. Better to switch off the flash and
use the light that's there in the scene, here a mixture of
tungsten (light bulbs) and daylight.
But won't it be too dark? No, as long as your camera can
compensate for the low light by leaving the shutter open for
longer. With slower shutter speeds there's a danger of blur,
so I placed the camera on the cabinet. The swivel lens feature
of the Nikon Coolpix is essential to be able to compose the
shot - you can turn the LCD screen to face you, frame the
shot, then move out of the way. Making sure the camera was
secure I gently pressed the shutter.
The shutter was open for about half a second, and thanks
to the excellent metering system in the Nikon Coolpix, perfectly
exposed (i.e. not too dark and not too light). No enhancement
was necessary.
|
|
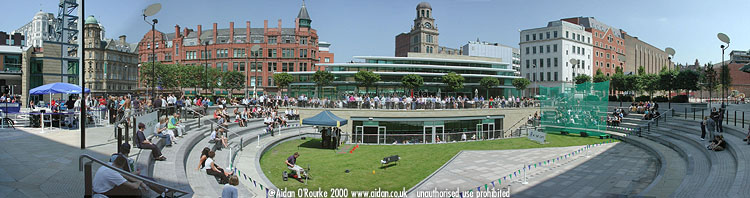
PANORAMA OF GREAT NORTHERN PIAZZA
How did you make this panorama? Did you use a panoramic
camera?
No, I didn't use a panoramic camera, I took a series of shots
with the Nikon Coolpix 990.
Holding the camera vertical, I turned the lens towards the
left of the scene and took the first shot. I turned the lens
a little to the right so the area of view overlaps with the
previous one. The swivel lens feature of the Nikon Coolpix
is essential here - you can hold the camera body steady, and
move only the lens. I continued to take overlapping shots
until I reached the right hand corner of the scene. The verticals
MUST be absolutely vertical, otherwise the pictures won't
match up. Check in the LCD viewfinder. Using a tripod and
a pano head is the most precise way to do it, but it's not
essential.
After transferring the image files to my iBook, I joined
the individual shots together using a program called Photovista.
It's easy: just select the series of photos, load them into
the viewing area click 'stitch panorama' and Photovista does
the rest.
Some post-enhancement in Photoshop may be necessary, e.g.
to get the sky smooth - select the blue areas and go over
them using the airbrush.
|
|
|
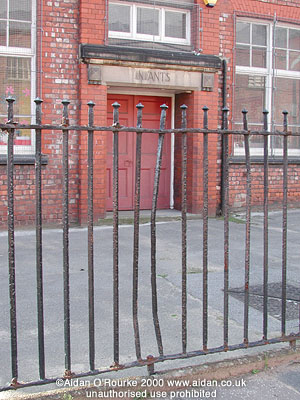
BENT SCHOOL RAILINGS, BOYLE ST, CHEETHAM HILL
The composition of this photograph looks pleasing. Why?
Even the most mundane subjects deserve good composition.
Here, I've positioned the camera so the lines give a pleasing
visual effect within the frame. Here are some 'rules of line':
Rule of thirds: Try to get the lines to cut across
the frame so they divide it roughly into thirds. The top of
the railing is about a third the way down, the wall meets
the playground not far off two thirds down - The two vertical
lines on either side of the door are about a third and two
thirds the way across.
Diagonals should exit the frame at at the corners:
Good geometry helps to make a good photograph - The bottom
of the railing makes a triangle with the bottom right hand
corner of the frame.
Foreground and background lines should be kept separate.
When framing the shot I adjusted the position of the camera
so that the white vertical line on the door cuts midway between
the gap in the railings. It forms a cross with the top of
the railings - this is the focal point of the picture.Keeping
the foreground and background lines separate helps to ensure
that the railings stand out from the background.
|
| More 'techie' pages will follow shortly. |
|
|
|
|
|
|